Вход
Рассмотрим принципиальные отличительные черты четырех типов разметки в Android: FrameLayout, RelativeLayout, LinearLayout и TableLayout.
FrameLayout - самый простой тип разметки. Может содержать только один дочерний элемент типа View или ViewGroup, который будет выравниваться по верхней левой границе. При добавлении последующих элементов они будут перекрывать друг друга. Пример:
<?xml version="1.0" encoding="utf-8"?>
<FrameLayout xmlns:android="http://schemas.android.com/apk/res/android"
    android:layout_width="fill_parent"
    android:layout_height="fill_parent"
    android:orientation="vertical" >

    <Button android:text="@string/button_text"
        android:id="@+id/btn1"
        android:layout_width="wrap_content"
        android:layout_height="wrap_content" />

</FrameLayout>
LinearLayout в отличие от FrameLayout может содержать больше одного элемента. Как следует из названия, LinearLayout является линейной разметкой, дочерние элементы которой размещаются друг за другом. Может размещать элементы как горизонтально, так и вертикально. При вертикальном размещении каждый элемент занимает отдельную строку, а при горизонтальном - элементы размещаются в одной строке, причем высота строки является высотой самого высокого дочернего элемента. Пример LinearLayout разметки с вертикальной ориентацией:
<?xml version="1.0" encoding="utf-8"?>
<LinearLayout xmlns:android="http://schemas.android.com/apk/res/android"
    android:layout_width="fill_parent"
    android:layout_height="fill_parent"
    android:orientation="vertical" >

    <Button android:text="I'm first button"
        android:id="@+id/btn1"
        android:layout_width="wrap_content"
        android:layout_height="wrap_content" />

    <TextView
        android:layout_width="wrap_content"
        android:layout_height="wrap_content"
        android:text="I'm text" />

    <Button android:text="I'm second button"
        android:id="@+id/btn2"
        android:layout_width="wrap_content"
        android:layout_height="wrap_content" />

</LinearLayout>
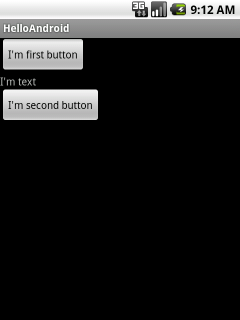
Рис 1. LinearLayout. Вертикальная ориентация
Чтобы получить горизонтальное размещение, достаточно изменить атрибут android:orientation, присвоив ему значение horizontal:

Рис 2. LinearLayout. Горизонтальная ориентация
Если Вы хотите, чтобы последний элемент "заливал" оставшееся на строке пространство, необходимо изменить его атрибут android:layout_width, присвоив значение: fill_parent:
...
    <Button android:text="Second"
        android:id="@+id/btn2"
        android:layout_width="fill_parent"
        android:layout_height="wrap_content" />
...
Результат выполнения этого примера показан на рис. 3:
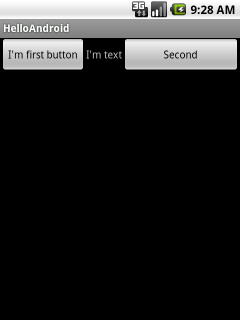
Рис 3. LinearLayout. Горизонтальная ориентация с использованием fill_parent
Рассмотрим еще одно широко используемое свойство - layout_weight ("вес размещения") на следующем примере:
<?xml version="1.0" encoding="utf-8"?>
<LinearLayout xmlns:android="http://schemas.android.com/apk/res/android"
    android:layout_width="fill_parent"
    android:layout_height="fill_parent"
    android:orientation="horizontal" >

    <Button android:text="Button1"
        android:id="@+id/btn1"
        android:layout_width="wrap_content"
        android:layout_height="wrap_content"
        android:layout_weight="1" />

    <Button android:text="Button2"
        android:id="@+id/btn2"
        android:layout_width="wrap_content"
        android:layout_height="wrap_content"
        android:layout_weight="2" />

    <Button android:text="Button3"
        android:id="@+id/btn2"
        android:layout_width="wrap_content"
        android:layout_height="wrap_content"
        android:layout_weight="0" />

</LinearLayout>
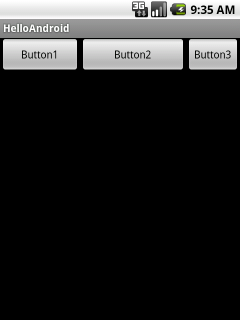
Рис 4. LinearLayout. Горизонтальная ориентация с использованием layout_weight
Как видно с Рис. 4, наибольшее пространство занимает Button2 из-за того, что имеет самый высокий layout_weight="2" среди остальных элементов. Button1 имеет вес 1 и поэтому занимает немного меньше пространства, чем Button2. Кнопка с самым низким весом, Button3, занимает меньше всего пространства.
Если бы кнопки Button1 и Button2 имели одинаковый вес, то занимали бы одинаковое пространство. А вот так располагаются кнопки в случае одинакового значения layout_weight:
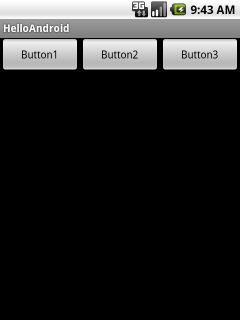
Рис 5. LinearLayout. Горизонтальная ориентация с одинаковым layout_weight
TableLayout позволяет создавать разметку по подобию таблицы в html. Строка таблицы, TableRow, может не иметь ячеек или иметь несколько ячеек. Допускается также ячейки типа ViewGroup. То есть, ячейка может быть другим типом разметки, в том числе и TableLayout. Пример TableLayout:
<?xml version="1.0" encoding="utf-8"?>
<TableLayout xmlns:android="http://schemas.android.com/apk/res/android"
    android:layout_width="fill_parent"
    android:layout_height="fill_parent" >

    <TableRow
        android:id="@+id/row1"
        android:layout_width="wrap_content"
        android:layout_height="wrap_content" >

        <Button
            android:id="@+id/btn1"
            android:layout_width="wrap_content"
            android:layout_height="wrap_content"
            android:text="1" />

        <Button
            android:id="@+id/btn2"
            android:layout_width="wrap_content"
            android:layout_height="wrap_content"
            android:text="2" />

        <Button
            android:id="@+id/btn3"
            android:layout_width="wrap_content"
            android:layout_height="wrap_content"
            android:text="3" />
    </TableRow>

    <TableRow
        android:id="@+id/row2"
        android:layout_width="wrap_content"
        android:layout_height="wrap_content" >

        <Button
            android:id="@+id/btn4"
            android:layout_width="wrap_content"
            android:layout_height="wrap_content"
            android:text="4" />

        <Button
            android:id="@+id/btn5"
            android:layout_width="wrap_content"
            android:layout_height="wrap_content"
            android:text="5" />

        <Button
            android:id="@+id/btn6"
            android:layout_width="wrap_content"
            android:layout_height="wrap_content"
            android:text="6" />
    </TableRow>

    <TableRow
        android:id="@+id/row3"
        android:layout_width="wrap_content"
        android:layout_height="wrap_content" >

        <Button
            android:id="@+id/btn7"
            android:layout_width="wrap_content"
            android:layout_height="wrap_content"
            android:text="7" />

        <Button
            android:id="@+id/btn8"
            android:layout_width="wrap_content"
            android:layout_height="wrap_content"
            android:text="8" />

        <Button
            android:id="@+id/btn9"
            android:layout_width="wrap_content"
            android:layout_height="wrap_content"
            android:text="9" />
    </TableRow>

</TableLayout>
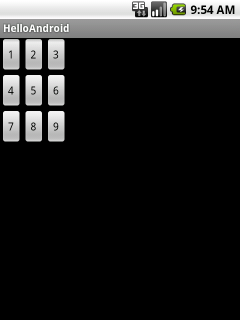
Рис 6. TableLayout
Для дочерних элементов так же как и в LinearLayout может использоваться свойство layout_weight. Изменим следующим образом пример: установим атрибут android:layout_weight="1" для элементов btn4, btn5 и btn6:
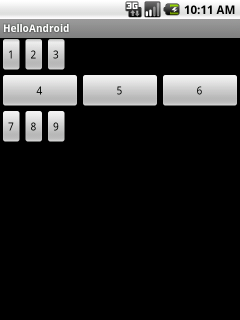
Рис 7. TableLayout с использованием layout_weight
Чтобы выровнять таблицу вертикально по центру, необходимо добавить атрибут android:gravity="center" в TableLayout:
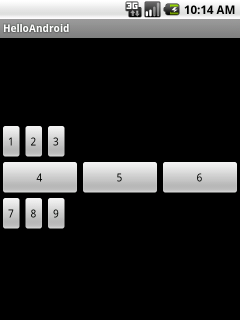
Рис 8. TableLayout с gravity=center
А чтобы выровнять по центру каждую строчку достаточно добавить атрибут android:gravity="center" во все три TableRow:
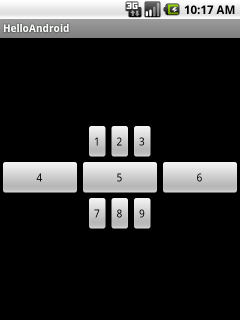
Рис 9. TableLayout с атрибутом gravity в TableRow
Исходный код получившейся разметки представлен ниже:
<?xml version="1.0" encoding="utf-8"?>
<TableLayout xmlns:android="http://schemas.android.com/apk/res/android"
    android:layout_width="fill_parent"
    android:layout_height="fill_parent"
    android:gravity="center" >

    <TableRow
        android:id="@+id/row1"
        android:layout_width="wrap_content"
        android:layout_height="wrap_content"
    	android:gravity="center" >

        <Button
            android:id="@+id/btn1"
            android:layout_width="wrap_content"
            android:layout_height="wrap_content"
            android:text="1" />

        <Button
            android:id="@+id/btn2"
            android:layout_width="wrap_content"
            android:layout_height="wrap_content"
            android:text="2" />

        <Button
            android:id="@+id/btn3"
            android:layout_width="wrap_content"
            android:layout_height="wrap_content"
            android:text="3" />
    </TableRow>

    <TableRow
        android:id="@+id/row2"
        android:layout_width="wrap_content"
        android:layout_height="wrap_content"
    	android:gravity="center" >

        <Button
            android:id="@+id/btn4"
            android:layout_width="wrap_content"
            android:layout_height="wrap_content"
            android:text="4"
            android:layout_weight="1" />

        <Button
            android:id="@+id/btn5"
            android:layout_width="wrap_content"
            android:layout_height="wrap_content"
            android:text="5"
            android:layout_weight="1" />

        <Button
            android:id="@+id/btn6"
            android:layout_width="wrap_content"
            android:layout_height="wrap_content"
            android:text="6"
            android:layout_weight="1" />
    </TableRow>

    <TableRow
        android:id="@+id/row3"
        android:layout_width="wrap_content"
        android:layout_height="wrap_content"
    	android:gravity="center" >

        <Button
            android:id="@+id/btn7"
            android:layout_width="wrap_content"
            android:layout_height="wrap_content"
            android:text="7" />

        <Button
            android:id="@+id/btn8"
            android:layout_width="wrap_content"
            android:layout_height="wrap_content"
            android:text="8" />

        <Button
            android:id="@+id/btn9"
            android:layout_width="wrap_content"
            android:layout_height="wrap_content"
            android:text="9" />
    </TableRow>

</TableLayout>
RelativeLayout - элементы этого способа разметки могут располагаться относительно друг друга, не следуя принципам поведения LinearLayout и TableLayout. Пример:
<?xml version="1.0" encoding="utf-8"?>
<RelativeLayout xmlns:android="http://schemas.android.com/apk/res/android"
    android:layout_width="fill_parent"
    android:layout_height="fill_parent" >

    <Button
        android:id="@+id/btn1"
        android:layout_width="wrap_content"
        android:layout_height="wrap_content"
        android:layout_centerHorizontal="true"
        android:text="1" />

    <Button
        android:id="@+id/btn2"
        android:layout_width="wrap_content"
        android:layout_height="wrap_content"
        android:layout_toLeftOf="@id/btn1"
        android:text="2" />

    <Button
        android:id="@+id/btn3"
        android:layout_width="wrap_content"
        android:layout_height="wrap_content"
        android:layout_toRightOf="@id/btn1"
        android:text="3" />
</RelativeLayout>
Первым элементом в списке размещения является кнопка с идентификатором btn1, однако фактически она будет второй слева. Это произойдет потому что слева от нее будет располагаться кнопка btn2, следуя инструкции layout_toLeftOf="@id/btn1" (переводится как "слева от btn1"). А кнопка btn3 будет всегда располагаться справа от btn1, следуя инструкции layout_toRightOf="@id/btn1" (переводится как "справа от btn1"). Горизонтальное расположение btn1 по центру достигается благодаря атрибуту layout_centerHorizontal="true". Результат выполнения этого кода представлен на Рис. 10.
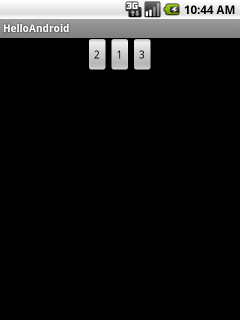
Рис 10. RelativeLayout. toLeftOf и toRightOf
Рассмотрим еще 2 атрибута, которые могут быть использованы в RelativeLayout: layout_above и layout_below. Атрибут layout_above означает, что элемент будет располагаться над элементом, указанным в атрибуте. В свою очередь, атрибут layout_below означает, что элемент будет располагаться под указанным в атрибуте элементом. Пример:
<?xml version="1.0" encoding="utf-8"?>
<RelativeLayout xmlns:android="http://schemas.android.com/apk/res/android"
    android:layout_width="fill_parent"
    android:layout_height="fill_parent" >

    <Button
        android:id="@+id/btn_center"
        android:layout_width="wrap_content"
        android:layout_height="wrap_content"
        android:layout_centerInParent="true"
        android:text="Center" />

    <Button
        android:id="@+id/btn_left"
        android:layout_width="wrap_content"
        android:layout_height="wrap_content"
        android:layout_centerInParent="true"
        android:layout_toLeftOf="@id/btn_center"
        android:text="Left" />

    <Button
        android:id="@+id/btn_right"
        android:layout_width="wrap_content"
        android:layout_height="wrap_content"
        android:layout_centerInParent="true"
        android:layout_toRightOf="@id/btn_center"
        android:text="Right" />

    <Button
        android:id="@+id/btn_top"
        android:layout_width="wrap_content"
        android:layout_height="wrap_content"
        android:layout_centerInParent="true"
        android:layout_above="@id/btn_center"
        android:text="Top" />

    <Button
        android:id="@+id/btn_bottom"
        android:layout_width="wrap_content"
        android:layout_height="wrap_content"
        android:layout_centerInParent="true"
        android:layout_below="@id/btn_center"
        android:text="Bottom" />

</RelativeLayout>
Результат выполнения этого кода представлен на Рис.11.
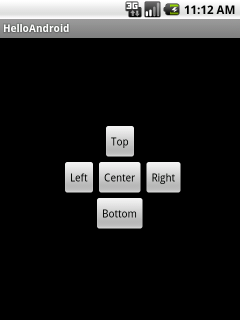
Рис 11. RelativeLayout. layout_above и layout_below